Nord VPN adalah salah satu pemain lama di dunia VPN dan aplikasi Windows dianggap antara yang terbaik di dunia PC. VPN VPN sangat pelbagai jika dituturkan dari segi fungsi dan fleksibiliti. Selain sokongan merentas platform, ia juga mempunyai pelayan yang berlainan di negara yang berbeza untuk anda pilih.

Walaupun aplikasinya sudah lama di pasaran, pengguna melaporkan bahawa mereka tidak dapat menyambung ke Nord VPN. Ini sama ada berhenti menyambung selepas kemungkinan kemas kini atau permintaan ke pelayan DNS sama ada mengembalikan respons 'habis masa'.
Apa yang menyebabkan Nord VPN tidak tersambung?
Oleh kerana VPN menggunakan keseluruhan seni bina internet sistem komputer, ada beberapa sebab mengapa Nord VPN anda mungkin tidak dapat tersambung dengan betul. Sebilangannya disenaraikan di bawah.
- IPv6: Nampaknya Nord VPN tidak menyokong protokol IPv6 dalam mana-mana komunikasinya. Oleh itu, jika ini diaktifkan, anda mungkin tidak dapat berhubung.
- Program pihak ketiga : Program pihak ketiga diketahui bertentangan dengan sistem perisian dan bersaing untuk mendapatkan sumber; oleh itu, menyebabkannya tidak dapat dihubungkan dengan betul.
- Penyesuai rangkaian: Oleh kerana Nord menggunakan penyesuai rangkaian yang terpisah untuk berkomunikasi dengan internet, mungkin penyesuai rangkaian tidak berfungsi dengan baik dan anda perlu menghidupkannya semula.
- Kesalahan dalam Rangkaian: Kadang kala konfigurasi rangkaian di komputer anda mungkin berada dalam keadaan ralat sehingga tidak ada sambungan sama sekali. Kita boleh mencuba menyegarkan semua pemboleh ubah dalam kes ini.
Sebelum kita memulakan dengan penyelesaiannya, anda perlu memastikan bahawa internet anda betul-betul berfungsi . Sekiranya internet anda tidak berfungsi dengan baik, Nord tidak akan dapat membuat sambungan yang betul dan memberi anda akses ke rangkaian terowong.
Pastikan anda menggunakan rangkaian peribadi (bukan sekolah, tempat kerja, atau tempat awam seperti hospital) dan tidak ada proksi yang terlibat. Setelah anda memeriksa semula bahawa internet anda berfungsi dengan baik, teruskan.
Penyelesaian 1: Melumpuhkan IPv6
IPv6 (Internet Version Protocol 6) adalah versi terbaru IP dalam seni bina rangkaian komputer. Secara lalai, kami masih menggunakan IPv4 dan masih belum beralih ke IPv6 secara kekal. Namun, mungkin ada di antara anda yang telah memulakan penggunaan IPv6 untuk penyambungan internet. Nampaknya IPv6 tidak berfungsi dengan baik dengan Nord VPN. Oleh itu kami akan melumpuhkannya dan periksa lagi.
- Klik kanan pada ikon rangkaian anda yang terdapat di bar tugas anda dan pilih Buka Rangkaian dan Tetapan Internet . Sekarang klik pilihan Tukar pilihan penyesuai dari tetapan.

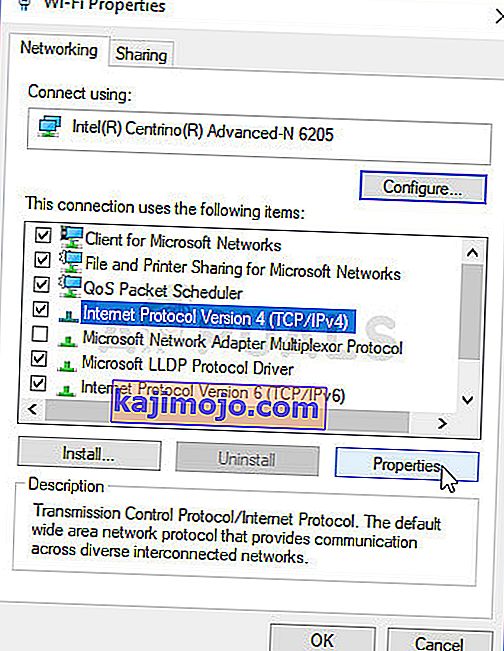
- Setelah berada dalam tetapan penyesuai, klik kanan pada penyesuai yang anda gunakan dan pilih Properties .
- Sekali dalam hartanah adapter, jangan tanda yang IPv6 pilihan dan memastikan bahawa IPv4 didayakan. Simpan perubahan dan keluar. Sekarang mulakan semula komputer anda dan periksa sama ada ralat diselesaikan dan anda dapat menyambung ke Nord VPN.

Penyelesaian 2: Memeriksa Aplikasi Pihak Ketiga
Terdapat banyak aplikasi dan program lain yang nampaknya bertentangan dengan Nord VPN dalam operasinya. Sekiranya terdapat lebih dari satu aplikasi yang cuba mengakses sumber, akan ada syarat perlumbaan dan mereka tidak akan berfungsi seperti yang diharapkan.

Anda harus memunculkan pengurus tugas (Windows + R dan 'taskmgr') dan memeriksa semua aplikasi yang berjalan di latar belakang. Salah satu aplikasi seperti itu yang diketahui menimbulkan masalah adalah Glasswire Elite . Pastikan anda menyahpasangnya atau memastikan ia dinyahaktifkan semasa anda cuba berhubung dengan Nord VPN.
Catatan: Anda juga boleh mencuba membersihkan but komputer anda. Ini akan melumpuhkan semua aplikasi pihak ketiga luaran dan hanya melancarkan aplikasi yang diperlukan. Sekarang anda boleh mencuba membuat sambungan. Sekiranya anda berjaya, ini bermakna ada beberapa aplikasi yang menyebabkan masalah tersebut. Anda boleh kembali dengan mengaktifkan setiap aplikasi dan memeriksa sekali lagi.
Penyelesaian 3: Menukar Lokasi Pelayan
Nord VPN memberikan pengguna pilihan untuk memilih lokasi pelayan mereka. Pelayan ini tersebar di seluruh dunia dan memberikan kesambungan mengikut lokasi geografi mereka iaitu pelayan yang lebih dekat dengan anda diharapkan akan lebih cepat. Kami akan cuba mengubah lokasi pelayan yang anda cuba sambungkan dan lihat apakah ini menyelesaikan masalah tidak menyambung.
- Lancarkan Nord VPN dan klik pada tajuk Server yang terdapat di bahagian atas aplikasi.

- Sekarang pilih pelayan yang berbeza daripada sebelum dan sesudah memilih, cuba aktifkan lagi VPN. Sekiranya anda mengalami tingkah laku yang sama, cuba pilih pelayan lain dan uji rangkaian di laman web lain.
Penyelesaian 4: Memulakan semula Penyesuai Rangkaian / TAP
Nord VPN membuat penyesuai rangkaian maya di komputer anda yang dapat digunakannya untuk menyampaikan maklumat. Ia bertindak seperti jambatan di mana Nord VPN mengubah tetapan sehingga dapat memulai dan mempertahankan sambungan VPN. Kadang-kadang ini berlaku dalam keadaan ralat yang menyebabkan anda tidak dapat berhubung dengan pelayan VPN anda. Kami akan menghidupkan semula penyesuai dengan betul yang akan memastikan bahawa semua konfigurasinya disusun semula.
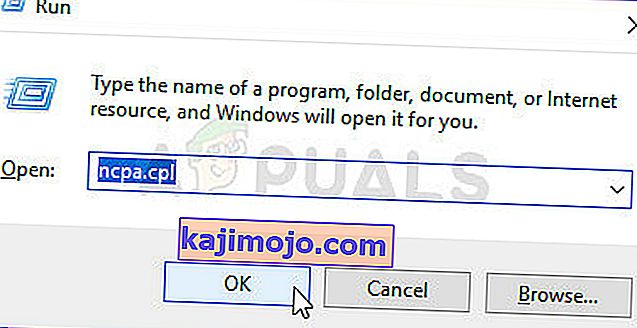
- Tekan Windows + R, taip “ ncpa. cpl ”di kotak dialog dan tekan Enter.
- Semua penyesuai rangkaian akan disenaraikan di hadapan anda. Pilih penyesuai TAP, klik kanan dan pilih Lumpuhkan .

- Setelah melumpuhkannya, tunggu sebentar. Kemudian klik kanan sekali lagi dan pilih Dayakan . Sekarang cuba sambungkan Nord VPN dan lihat apakah ini berjaya.
Penyelesaian 5: Susun Rangkaian Flushing
Terdapat banyak contoh di mana pembilasan (penyegaran) timbunan rangkaian di komputer anda menyelesaikan pelbagai masalah berkaitan VPN (termasuk Nord). Proses ini akan menghilangkan tetapan DNS dan IP anda dan memastikan tidak ada tetapan yang tidak betul yang mungkin bertentangan dengan aplikasi.
- Tekan Windows + S, ketik "command prompt" di kotak dialog, klik kanan pada aplikasi dan pilih Run as administrator .
- Setelah berada di command prompt yang tinggi, jalankan perintah berikut satu per satu diikuti oleh tombol Enter setelah setiap perintah:
ipconfig / release ipconfig / flushdns ipconfig / renew netsh winsock reset netsh interface ipv4 reset netsh interface ipv6 reset netsh winsock reset katalog netsh int ipv4 reset reset.log netsh int ipv6 reset reset.log

- Now close the command prompt and try launching Nord VPN again. Check if you can connect with it properly.
Solution 6: Reinstalling Nord VPN (along with the TAP adapter)
If all the above methods don’t work, you need to make sure that your Nord installation is proper and there is nothing wrong with the installation files. The TAP adapter will also be reinstalled in the process because Nord VPN manages the adapter and it is only for its use. Make sure that you are logged in as an administrator. If reinstalling doesn’t work, make sure that your credentials are correct which you are entering the services have not expired.
- Press Windows + R, type “appwiz.cpl” in the dialogue box and press Enter.
- Once in the application manager, search for the entry Nord VPN from the list, right-click on it and select Uninstall.

- Now restart your computer and download the application again from Nord VPN’s official website. Now after entering your credentials, try connecting again and check if you can establish the VPN connection correctly.
Solution 7: Using an Alternative VPN Service
There are numerous VPN clients out there in the Windows market. However, we recommend or readers to try CyberGhost. This VPN service is as simple as it gets and also provides you with servers located at different countries. It even has separate VPN servers for streaming Netflix and BBC with ease. Follow the steps below to download the application and get your connection secure in no time.
- Download CyberGhost from (here).

- After downloading the VPN, install it on your computer. You might be asked for proper permissions. Make sure that you are logged in as an administrator and press Yes to all the permissions asked.
- After CyberGhost is installed on your computer, launch it. Here you will see a list of different servers available along with the distance from your actual location (more distance means slower internet).

- After selecting the server, click on the power button present at the right-hand side of the application. You can also select dedicated servers for torrenting and streaming (present at the left navigation pane).
Solution 8: Disable Firewall
In some cases, the default Windows Firewall might be preventing the application from working properly. Therefore, in this step, we will first be allowing it through the Firewall and make sure that it isn’t blocked by the Firewall and then we will also make sure that Windows Defender has it added as an exception. For that:
- Press “Windows” + “R” to launch the Run prompt.
- Type in “ControlPanel” and press “Enter” to launch the classical control panel interface.

- Click on the “View by:” button, select “Large Icons” and then click on the Windows Defender Firewall option.
- Select the “Allow an app orfeature through the Firewall” button on the left pane and then click on the “Change Settings” button and accept the prompt.
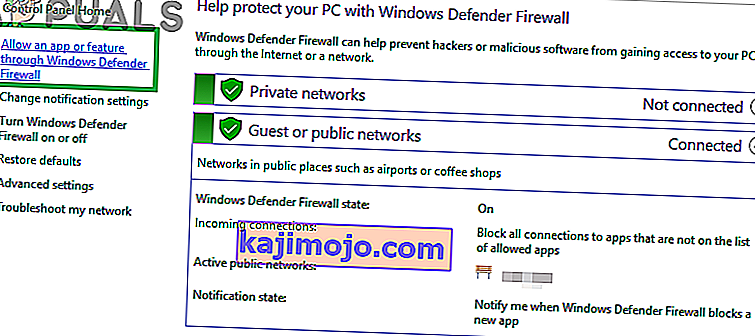
- From here, make sure that you check both the “Public” and the “Private” options for Nord VPN and its related applications/drivers.
- Save your changes and exit out of the window.
- After that, press “Windows” + “I” to launch the settings and click on the “Updateand Security” option.
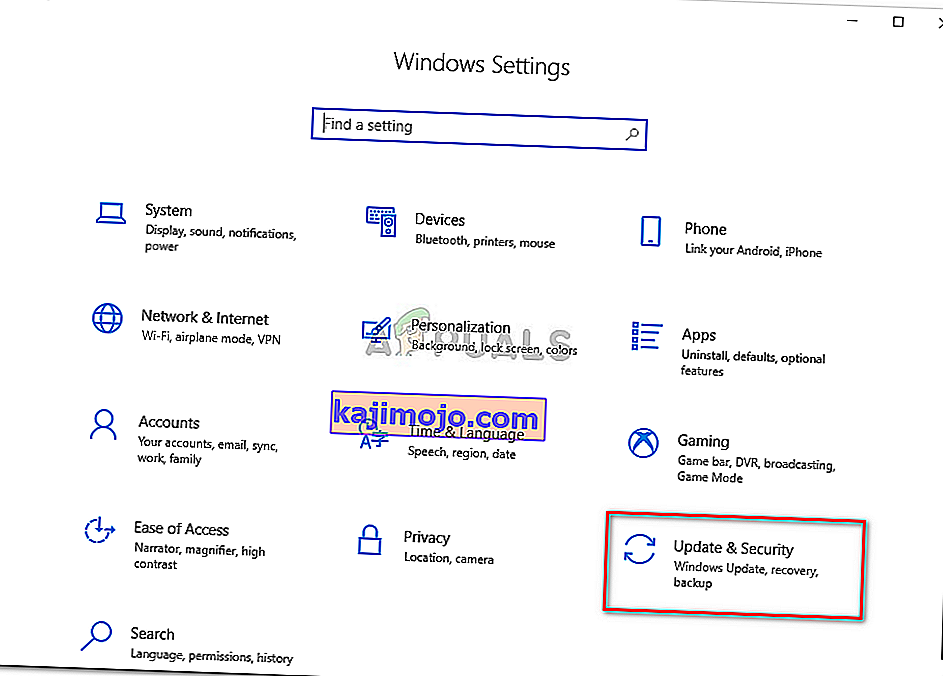
- From the left pane, click on the “Windows Security” button and then click on the “Virus and Threat Protection” button.
- Select the “Manage Settings” button under the Virus and Threat Protection Settings heading.
- Scroll down and click on the “Add or Remove Exclusions” button in the next window.
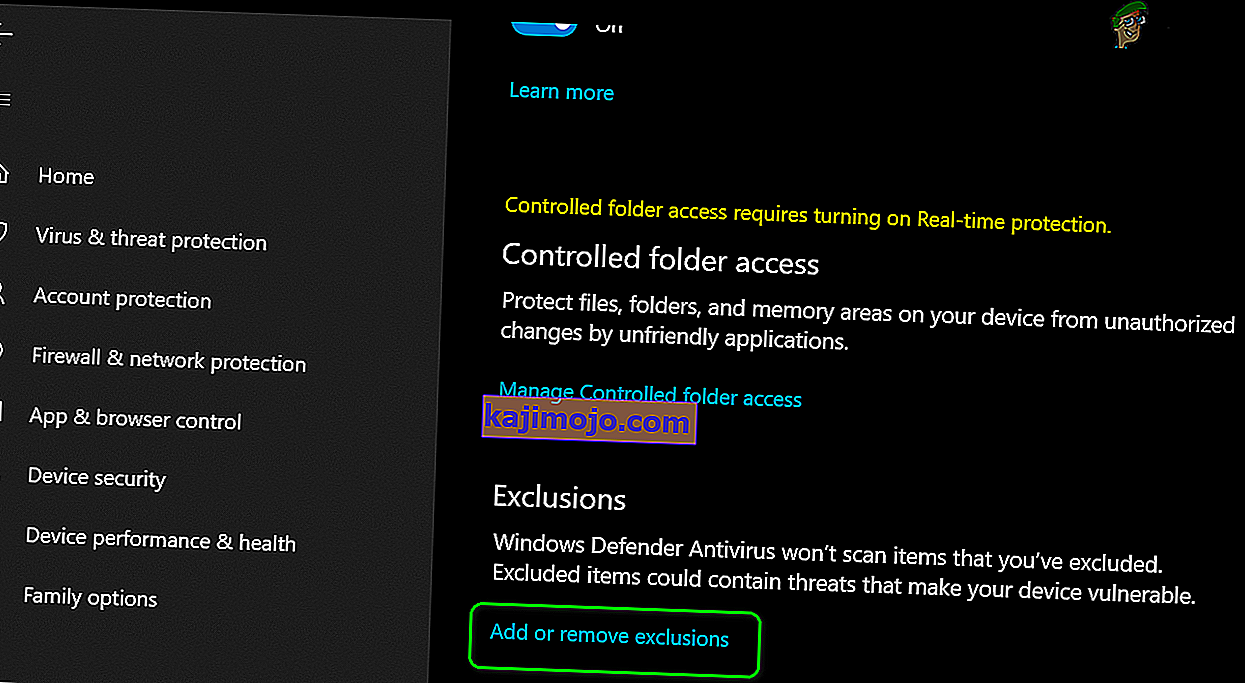
- Click on the “Add an Exclusion” option and select “Folder’ from the File type.
- Make sure to specify the Nord VPN folder and exit out of this window after saving your changes
- Check and see if doing so has fixed the issue with Nord VPN not connecting.


Solution 9: Change NordVPN Protocol
It is possible that Nord VPN might be running into issues while trying to connect to its servers due to the protocol configuration in its settings. If one type of protocol isn’t working for you, it is always recommended to try and switch to the other protocol to make sure that the issue isn’t tied to the wrong selection of the protocol type automatically or manually. For that:
- Launch NordVPN and make sure to disconnect from any currently active sessions.
- Click on the “Gear” icon on the top right corner and go into the settings.
- Click on the “Advanced” option from the left-hand side menu.
- Click on the “Protocol” dropdown and check on “TCP”.
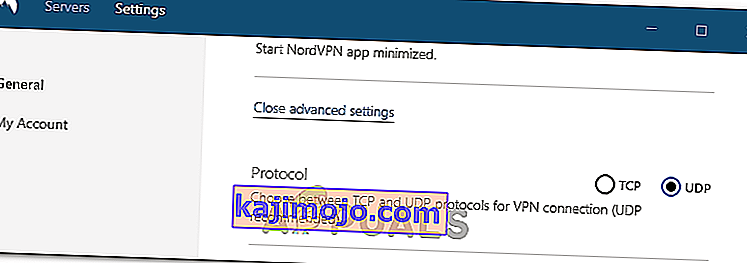
- This should change your protocol from TCP to UDP.
- Check to see if doing so fixes the issue for your computer.
- To Verify that none of the protocols work, make sure to repeat the steps and select “UDP” instead of TCP and then check again.
- If none of the selected protocols are able to make a connection with the server, move on to the other fixes.

Solution 10: Changing DNS Server Configuration
DNS Servers are used by the computer to establish a stable and secure internet connection with other sites on the internet, however, if the computer is unable to detect the DNS settings properly, or if the selected DNS server is facing outage, Nord VPN might not connect properly. Therefore, in this step, we will be changing the DNS configuration to ensure that DNS isn’t an issue. For that:
- Press “Windows” + “R” to launch the Run prompt.
- Type in “ncpa.cpl” and press “Enter” on the keyboard to launch the network configuration panel.
- Right-click on your internet connection and select the “Properties” option.
- Double click on the “Internet Protocol Version4 (TCP/IPV4)” option and check on the “Use the following DNS addresses” button.
- At first, type in “8.8.8.8” and “8.8.4.4” in the primary and the secondary DNS addresses field respectively and click on “OK”. After that, check to see if NordVPN is connecting, if it isn’t, try to use “103.86.96.100” and “103.86.99.100” in the primary and the secondary fields respectively.
- Check to see if you are able to make a connection by selecting those DNS servers.


Solution 11: Opening Ports
For some people, the issue might arise if the ports that NordVPN uses to communicate with its servers are being blocked by your router. For security reasons most routers often block ports used by VPN/Network Tools to prevent any alterations to your connections and if that is the case, we will have to open the ports by logging in to the router’s control panel. For that:
- Press “Windows” + “R” to launch the Run prompt and type in “cmd” and then press “Ctrl” + “Shift’ + “Enter” keys on your keyboard to provide admin permissions.

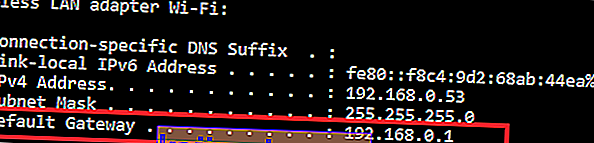
- Type in the following command in the command prompt to list the IP information.
ipconfig /all
- The computer will list all the information of the network adapters connected to your computer.
- Under the default gateway option, after the mac address, there should be an IP address that should look something like “192.168.x.x”.
- Copy this IP address and launch your browser.
- Paste the IP address within a new tab on the browser and press “Enter” to navigate to the browser’s login page.
- Once on the login page, log into the control panel with your credentials, both of which, i.e the username and password should be written on the back of your internet router. If not, then the username should be admin and the password should be the Wifi password that you use to connect your devices.
- After logging into the Control panel, look around for a “NAT” or “Port” option that allows you to forward ports.
- Type in “500” and select “UDP” from the list.
- Click on “Save” to forward the 500 UDP port and exit out of the control panel after the change has been made.
- Try connecting with Nord VPN and check to see if the issue persists.


Solution 12: Use Hotspot
Mostly, this error can be fixed simply by employing your mobile’s hotspot connection instead of the Wifi or the Wired connection that you are already using on your computer. This does seem an inconvenience for Data conscious people but it seems to be the only way some people are able to connect through Nord VPN as some routers block it completely.
Note: In addition to this, you can try to change the firmware on your router to avoid any permanent blocks put from the router or to eliminate any bugs with the connection.